
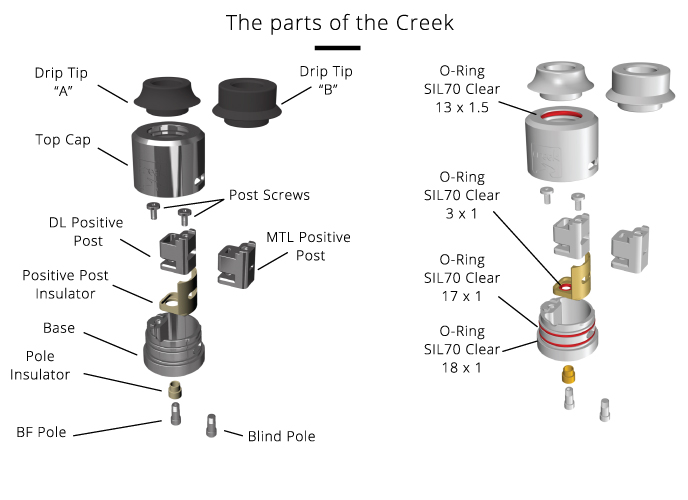
Repairable Atomisers, Support
Creek

Sep
Contents
This is the support page for the Creek. The page will be updated gradually, as more feedback and inquiries keep coming in.
1. Getting Started

2. Tips and Tricks
Below you can read some really useful tips and tricks about your Creek RDA. Maintenance, rebuilding and any other procedure are much easier if you take into account the following info:
First Use
There is no need for boiling/cleaning preparation of your new Creek RDA before first use. All parts are cleaned in ultrasonic bath and sterilised with hot steam before assembled and put in the box.
However, before using your Creek RDA for the first time and after any washing/maintenance of its components, always lubricate the o-rings and the surfaces of collaborating parts, by using your e-liquid as a lubricating medium. This will ensure long life and optimal function of the device and its real time adjustments. Especially o-rings around the Base that tend to be over-stressed with the air adjustment need this, more than any other part of the device.
**No need to overdo with this. A cotton swab is what you just need, to lubricate without excessive quantity of e-liquid. One pass around o-rings and surfaces of collaborating parts will do the job.**
Especially red and transparent white o-rings should be handled with attention while assembling/disassembling, as they are silicon o-rings (thus softer than NBR black o-rings).
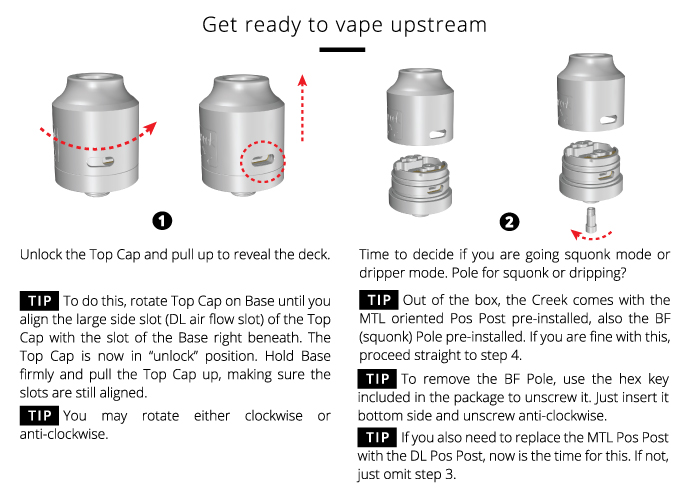
Locking Mechanism
The Creek incorporates a simple locking mechanism via a one-way alignment design of its Base and Top Cap.
This ensures compliance with TPD child-proof requirement, also protecting you from accidental opening of the device, eg when carried in your bag or pocket.
To unlock, rotate Top Cap on Base until you align the large side slot (DL air flow slot) of the Top Cap with the slot of the Base right beneath. The Top Cap is now in “unlock” position. Hold Base firmly and pull the Top Cap up, making sure the slots are still aligned.
It is very important that you align the two large slots of the Base and Top Cap with attention when trying to open (disassemble) or close back on (re-assemble). If the large slots are not perfectly aligned, the device won’t open or close, and there a danger of causing damage to its o-rings or other parts if forced in a wrong way.
The MTL KIT
Intro
The MTL Kit turns your Creek into a dedicated MTL RDA, with potential air flow D=1.2mm or D=1.5mm and a chamber reducer for enhanced MTL experience.
It includes:
-One Positive Post Adapter, made of SS316
-One Air Flow Insert with Inner D=1.2mm, made of PEEK thermoplastic polymer
-One Air Flow Insert with Inner D=1.5mm made of PEEK thermoplastic polymer
-One Chamber Reducer, made of Yellow Ultem
-Two extra replacement NBR black o-rings for the Air Flow Inserts
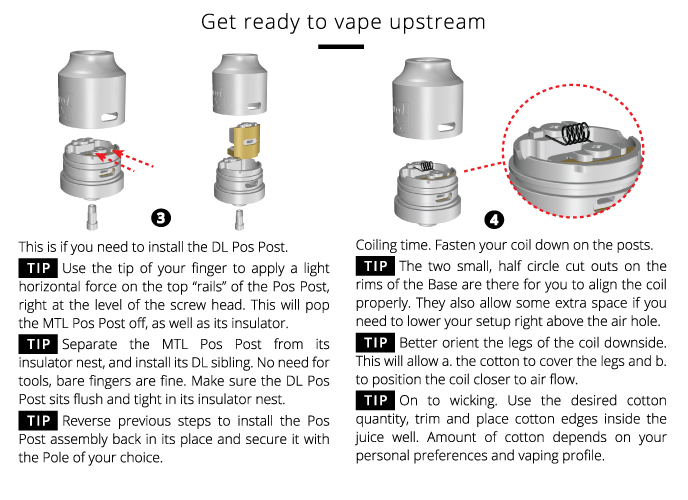
Installation
All you need to do is to install the air flow insert of your choice inside the positive post adapter and then replace the positive post that you have inside your Creek with this new assembly.
For reduced vaporisation chamber you may also place the dedicated ultem chamber reducer on top of the Base, before adding the Top Cap. Please notice the chamber reducer should sit only one way on the Base, as its small legs that go inside the base cutouts are off-centered, exactly like the legs of the reducer. If you put it mirrored, it will sit, but will obviously be displaced horizontally and even possibly prevent the Top Cap from fitting on top.
Chamber Reducer function
Depending on batches dimensional deviation, it is normal for the Reducer to either sit tight on top of the Base, or be a bit loose when sitting there. If loose, after you put the Top Cap on, condensations produced after your first 4-5 draws will make the Reducer stick to the upper part of the Top Cap. It will remain there each time you take the Top Cap off as a one part assembly. When you put it back on, it will be already properly oriented – so no need to take it out and install it from scratch.
If installed correctly, the chamber reducer should look like this.


Rebuilding the Creek
Rebuilding procedure is quite straightforward, however there are some useful tips you need to know before rebuilding.
TIP #1:
The two small, half circle cut outs on the rims of the Base are there for you to align the coil properly. They also allow some extra space if you need to lower your setup right above the air hole.
TIP #2:
Better orient the legs of the coil downside. This will allow a. the cotton to cover the legs and b. to position the coil closer to air flow.
TIP #3:
Pole screws should be screwed down all the way in order to grab the coil edges firmly in place. Do not overdo with this, as this will end up to wear and tear much quicker than normal. Don’t forget the purpose: The wire should have a firm electric connection with the poles. You won’t need to hang anything from the coil, so there is no need to use all the torque of the world when screwing down.
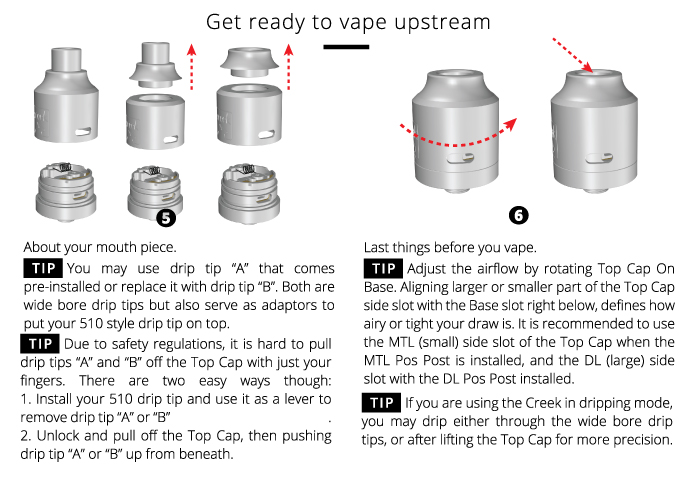
Top Cap O-rings
The standard o-ring which comes pre-installed inside the Top Cap rim, as well as its replacement in the bag of spares, ensure a normally tight collaboration with the two wide-bore drip tips of the Creek. However, you may find an extra fatter o-ring inside the bag of spares, which offers super tight collaboration with the Top Cap. This will help those that use really long 510 drip tips on top or anyone needing their mouth piece to sit “glued” on top of the Top Cap. Installing this fatty o-ring requires being really cautious, as it is purposefully oversized and thus hard to install inside its housing groove of the Top Cap.
Base Cap O-rings
As the Base o-rings are silicon orings, we have introduced the option of NBR orings to ensure more durability and piece of mind. If you think you prefer this against aesthetics, you can always go for the NBR option.